apache solr实践之部署,分片,集合
本章介绍一个很流行的搜索引擎---apache solr,现在最流行的搜索引擎非solr和ES必属,本文从应用入手介绍solr的部署和基本应用。
solr入门基本概念
- Collections
- SolrCloud集群中的一个完整的逻辑上的倒排索引(什么是倒排索引?),和一个独立的config set相关联,由一个或者多个shard组成,shard可以在不同的服务器上,shard对搜索接口的调用者来说是隐形的,搜索者不用考虑在搜索时如何指定shard,只需要传入Collection名即可。
- Config Set
- 包含两个最根本的配置文件:solrconfig.xml和schema.xml,视这两个文件的内容而定是否需要包含其他文件。SolrCloud的config set目录会上传到zookeeper中,而传统单机Solr的config set是保存在本地文件夹中。
- Core
- 一个Solr Core是一个包含索引和配置文件的运行实例,以前Solr Core是单例模式的,后来重构成了多实例的,(什么是SolrCores?)。一个Replica对应一个Core实例,同一个Shard对应的Replica的Core的配置和索引数据是一样的,但是是不同实例。
- Replica
- Shard的一个副本。一个Shard会在不同的服务器上保留Repicas(副本),通过选举机制(和zookeeper的leader选举机制类似)在Replicas(副本)中选出一个leader来对外提供服务。leader连不上了就重新选其他副本作为leader,这样能保证至多(副本数-1)台服务器挂掉后仍然能正常工作。
- Shard
- Collection的一个逻辑分片。每个Shard对应一个Core,并且包含一个索引(Collection)的文档(Documents)的不相交子集,一个Shard由至少一个Replica组成,当有多个Replicas时,选举机制选出作为leader的Replica。单机Solr中,Shard指的是Solr cores.
- Zookeeper
- 分布式集群的基本组件,MapReduce、HDFS、Hive等分布式系统都基于它,Leader选举也要靠它。Solr有自己的内嵌Zookeeper,但是一般不会用内嵌的。部署Zookeeper至少需要3台主机(出于节约成本,可以和Solr实例部署在相同的服务器上,目前很多Solr users都是这么用的)。
配置
- CentOS Linux release 7.4.1708 (Core)
- jdk-7u80-linux-x64
- zookeeper-3.4.11.tar.gz
- solr-5.2.1.tgz
各个术语之间对应关系图:
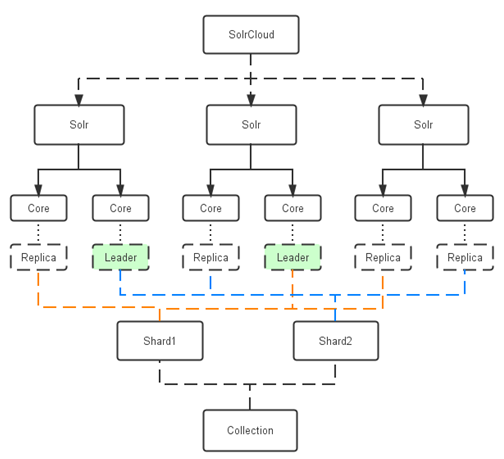
创建上图collection对应的配置为:
numShards=2
replicationFactor=3
maxShardsPerNode=2
liveSolrNode=3
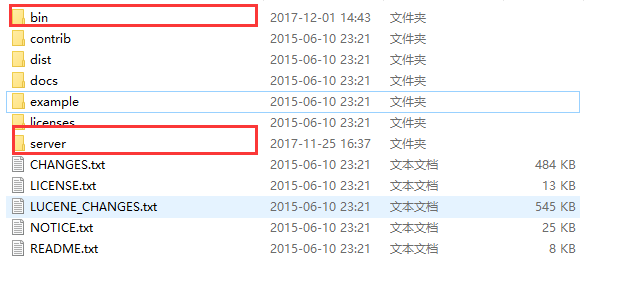
1.上传solr到linux并解压,solr目录如下(只需了解红线部分,其他忽略。):
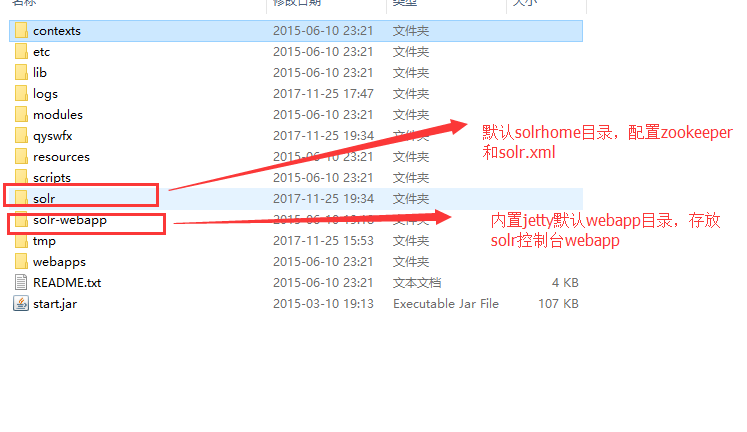
2.sorl的server目录是重点:
3.复制server\lib\ext内log4j-1.2.17.jar包到server\solr-webapp\webapp\WEB-INF\lib,
复制contrib\analysis-extras\lucene-libs内lucene-analyzers-smartcn-5.2.1.jar包到server\solr-webapp\webapp\WEB-INF\lib
4.修改server\solr-webapp\webapp\WEB-INF\web.xml,配置solr home
<env-entry>
   <env-entry-name>solr/home</env-entry-name>
   <env-entry-value>yourSolrHomeDir</env-entry-value>
   <env-entry-type>java.lang.String</env-entry-type>
</env-entry>
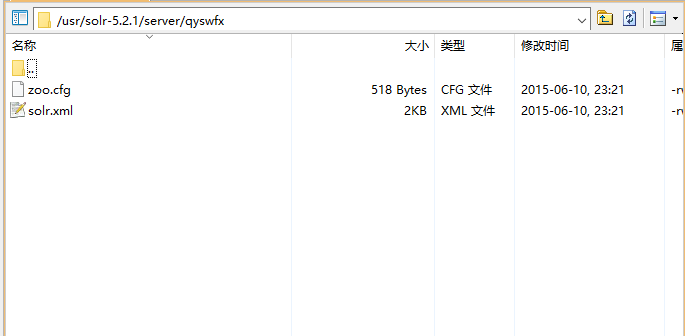
5.新建solrHome文件夹server/qyswfx文件夹,并保证该文件夹有solr.xml和zoo.cfg配置文件:
6.从solr-5.2.1/server/solr/configsets/复制一份data_driven_schema_configs配置文件夹qyswfx,并修改solrconfig.xml和schema.xml文件:
6.1配置solrconfig.xml,这里只展示真正修改的代码片段,文件在这里:
solrconfig.xml
设置索引插入时的提交方式为服务端提交。autoCommit为15000ms提交一次,autoSoftCommit为1000ms或doc数量>=1000时提交一次
<updateHandler class="solr.DirectUpdateHandler2">
    <updateLog>
      <str name="dir">${solr.ulog.dir:}</str>
    </updateLog>

     <autoCommit>
        <maxTime>${solr.autoCommit.maxTime:15000}</maxTime>
        <openSearcher>false</openSearcher>
     </autoCommit>

     <autoSoftCommit>
        <maxDocs>1000</maxDocs>
        <maxTime>${solr.autoSoftCommit.maxTime:1000}</maxTime>
     </autoSoftCommit>

</updateHandler>
6.2配置schema.xml,这里只展示真正修改的代码片段,文件在这里:
schema.xml
schema.xml作用:Solr stores details about the field types and fields it is expected to understand in a schema file. The name and location of this file may vary depending on how you initially configured Solr or if you modified it later.
根据业务需求定制schema.xml:给一个数据库表并指定表里的若干字段,将表里的数据导入索引集合。因为字段名是动态的,所以要使用dynamicField
  <fields>
    <field name="_version_" type="long" indexed="true" stored="true"/>
    <field name="text" type="text_smartcn" indexed="true" stored="false" multiValued="true"/>
    <field name="id" type="string" indexed="true" stored="true" required="true" multiValued="false" />
  </fields>

  <!-- 动态字段,用于后台维护索引字段,不可索引部分 -->
  <dynamicField name="*_i"  type="int"    indexed="false"  stored="true"/>
  <dynamicField name="*_s"  type="string"  indexed="false"  stored="true"/>
  <dynamicField name="*_l"  type="long"   indexed="false"  stored="true"/>
  <dynamicField name="*_d" type="double" indexed="false"  stored="true"/>
  <dynamicField name="*_f"  type="float"  indexed="false"  stored="true"/>
  <dynamicField name="*_b"  type="boolean" indexed="false" stored="true"/>
  <dynamicField name="*_text" type="text_general"   indexed="false"  stored="true"/>
  <dynamicField name="*_textcn"  type="text_smartcn"    indexed="false"  stored="true"/>

  <!-- 动态字段,用于后台维护索引字段,可索引部分 -->
  <dynamicField name="*_i_i"  type="int"    indexed="true"  stored="true"/>
  <dynamicField name="*_i_s"  type="string"  indexed="true"  stored="true"/>
  <dynamicField name="*_i_l"  type="long"   indexed="true"  stored="true"/>
  <dynamicField name="*_i_d" type="double" indexed="true"  stored="true"/>
  <dynamicField name="*_i_f"  type="float"  indexed="true"  stored="true"/>
  <dynamicField name="*_i_b"  type="boolean" indexed="true" stored="true"/>
  <dynamicField name="*_i_text" type="text_general"   indexed="true"  stored="true"/>
  <dynamicField name="*_i_textcn"  type="text_smartcn"    indexed="true"  stored="true"/>

  <!-- 文档的唯一标识,可理解为主键,除非标识为required="false", 否则值不能为空-->
  <uniqueKey>id</uniqueKey>
6.3配置schema.xml的中文分词器
    <fieldType name="text_smartcn" class="solr.TextField" positionIncrementGap="100">
    <!--  solr自带中文分词器 -->
    <analyzer type="index" isMaxWordLength="true">
      <tokenizer class="solr.SmartChineseSentenceTokenizerFactory" />
      <filter class="solr.SmartChineseWordTokenFilterFactory" />
    </analyzer>
    <analyzer type="query" isMaxWordLength="true">
      <tokenizer class="solr.SmartChineseSentenceTokenizerFactory" />
      <filter class="solr.SmartChineseWordTokenFilterFactory" />
    </analyzer>
    </fieldType>
////////////////////////////上面solr基本配置完成,下面介绍SolrCloud的配置////////////////////////////
7.配置solrhome目录下的solr.xml
只有当solr实例以集群的方式启动的时候,也就是启动带有参数-DzkRun 或 -DzkHost的时候,</solrcloud>才会起效。
<?xml version="1.0" encoding="UTF-8" ?>

<solr>

  <solrcloud>

    <str name="host">${host:}</str>
    <int name="hostPort">${jetty.port:8983}</int>
    <str name="hostContext">${hostContext:solr}</str>

    <!--zk地址列表-->
    <str name="zkHost">111.230.211.90:2181,111.230.223.233:2181</str>
    <int name="zkClientTimeout">${zkClientTimeout:30000}</int>

    <bool name="genericCoreNodeNames">${genericCoreNodeNames:true}</bool>
    <int name="distribUpdateSoTimeout">${distribUpdateSoTimeout:600000}</int>
    <int name="distribUpdateConnTimeout">${distribUpdateConnTimeout:60000}</int>

  </solrcloud>

  <shardHandlerFactory name="shardHandlerFactory"
    class="HttpShardHandlerFactory">
    <int name="socketTimeout">${socketTimeout:600000}</int>
    <int name="connTimeout">${connTimeout:60000}</int>
  </shardHandlerFactory>

</solr>
8.因为上传配置文件到要求solr必须以cloud的方式启动,所以以solr cloud的方式在solrHome启动solr
我们暂时只有2个节点:111.230.211.90; 111.230.223.233,端口都是2181。
.bin/solr start -c -s /usr/solr-5.2.1/server/qyswfx -p 8983 -z 111.230.211.90:2181,111.230.223.233:2181
//如果需要停止solr服务,使用下面命令
.bin/solr stop -all
启动成功后信息如下:
[root@VM_0_12_centos bin]# ./solr start -c -s /usr/solr-5.2.1/server/qyswfx -p 8983 -z 111.230.211.90:2181,111.230.223.233:2181
Waiting to see Solr listening on port 8983 [/]
Started Solr server on port 8983 (pid=11211). Happy searching!
9.利用zkcli上传配置文件夹到zk集群,供后面创建collection使用。
-zkhost指定ZooKeeper地址,逗号分割,-confdir为配置文件目录。-confname指定该配置的名称。
server/scripts/cloud-scripts/zkcli.sh -zkhost 111.230.211.90:2181,111.230.223.233:2181 -cmd upconfig -confname qyswfx_conf -confdir server/qyswfx/qyswfx_configs/conf

//查看命令
server/scripts/cloud-scripts/zkcli help
//查看zk配置文件信息
server/scripts/cloud-scripts/zkcli -zkhost 111.230.211.90:2181,111.230.223.233:2181 -cmd list
上传成功后部分信息如下:
 /configs/qyswfx_conf/mapping-FoldToASCII.txt
INFO  - 2018-03-22 12:57:12.382; org.apache.solr.common.cloud.SolrZkClient; makePath /configs/qyswfx_conf/protwords.txt
INFO  - 2018-03-22 12:57:12.395; org.apache.solr.common.cloud.SolrZkClient; makePath /configs/qyswfx_conf/spellings.txt
INFO  - 2018-03-22 12:57:12.402; org.apache.solr.common.cloud.SolrZkClient; makePath /configs/qyswfx_conf/elevate.xml
INFO  - 2018-03-22 12:57:12.409; org.apache.solr.common.cloud.SolrZkClient; makePath /configs/qyswfx_conf/stopwords.txt
INFO  - 2018-03-22 12:57:12.421; org.apache.solr.common.cloud.SolrZkClient; makePath /configs/qyswfx_conf/solrconfig.xml
INFO  - 2018-03-22 12:57:13.750; org.apache.solr.common.cloud.SolrZkClient; makePath /configs/qyswfx_conf/update-script.js
INFO  - 2018-03-22 12:57:13.761; org.apache.zookeeper.ZooKeeper; Session: 0x2001ceb33a0000 closed
INFO  - 2018-03-22 12:57:13.761; org.apache.zookeeper.ClientCnxn$EventThread; EventTread shut down
10.通过http协议与solr交互(可以在浏览器栏测试,生产中我们使用代码自动化执行。),使用上传的配置文件qyswfx_conf,创建一个collection集合,分片数量numShards=2,复制因子replicationFactor=2
//如果你在1台机器:111.230.211.90:8983部署了solr
http://111.230.211.90:8983/solr/admin/collections?action=CREATE&name=collection_hmdcx&numShards=2&replicationFactor=1&maxShardsPerNode=2&collection.configName=qyswfx_conf

//如果你在2台机器:111.230.211.90:8983,111.230.223.233:8983都部署了solr
http://111.230.211.90:8983/solr/admin/collections?action=CREATE&name=collection_hmdcx&numShards=2&replicationFactor=2&maxShardsPerNode=2&collection.configName=qyswfx_conf
numShards: collection分成多少片shard
replicationFactor:每片shard由多少个复制组成,(replicationFactor=1表示每份shard只有1份,replicationFactor=2表示每份shard有2份,1份数据节点,1份备份节点)
maxShardsPerNode: 对于某个collection,每个节点允许的最大分片数
liveSolrNode:当前存活的solr节点
注意:一个正常的solrCloud集群不容许一个liveSolrNode上部署同一个shard的多个replic,因此正确时因满足以下条件:numShards*replicationFactor<liveSolrNode*maxShardsPerNode
11.删除collection集合collection_hmdcx
http://111.230.211.90:8983/solr/admin/collections?action=DELETE&name=collection_hmdcx
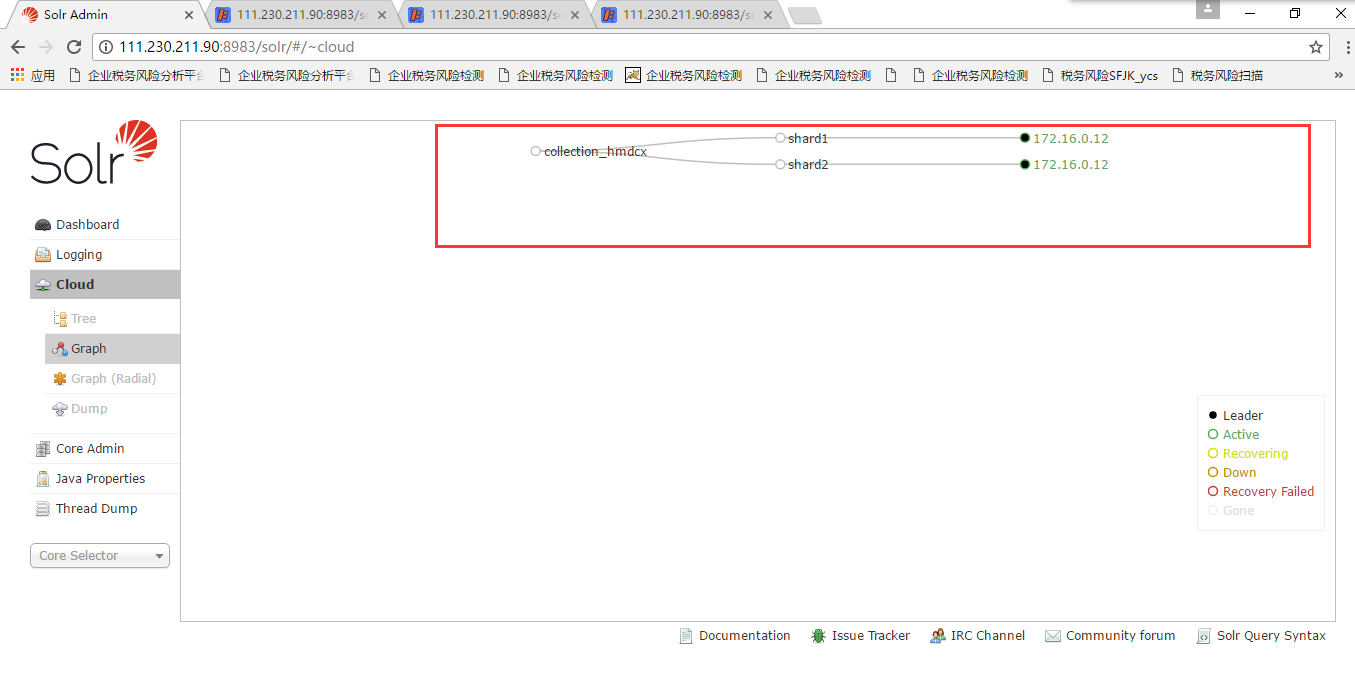
12.在webapp控制台查看我们创建的collection集合:
12.关于solr控制台webapp由solr内置jetty启动还是放到tomcat里面的问题,个人认为还是由jetty启动该webapp,原因如下:
(1)在业务上,tomcat用来运行我们项目的webapp,版本发行的时候需要重启,我们的搜索服务在业务场景上应该跟它剥离。
(2)在技术上,使用jetty来运行solr控制台webapp,一样可以做访问控制/二次定制。